Welcome to the third and final instalment of our blog series showcasing the upcoming Player-Built Settlements (PBS) system. This part will tell you about the new island layout, the various building types and their purpose, and the concept of control and assimilation. If you haven’t read the first two parts, it’s highly recommended to do so, in order to better understand the things I’m about to explain here. The first part about terraforming is here, and the second one about building and planning is here.
24 new islands to explore and live on
There’s been a lot of speculation going on on the forums about how many new islands there will (or should) be. Some said an absolute minimum of 12, some argued we shouldn’t stop under a few hundred :)
While we’d love to have the latter number in the future, for now we have settled for 24 new terraformable gamma islands. We feel that this should provide ample space for our current and anticipated playerbase without creating a vacuum. Of course we’ll be ready to add even more islands in the near future if the demand arises.
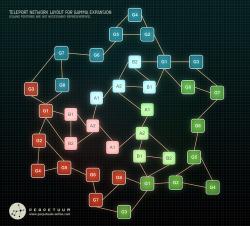
We’re not only adding new islands, we’re also revamping the entire connection network of the current alpha and beta ones. Some of you have voiced your concerns, and we also feel that the current teleport network is so dense that it makes the world feel rather small. Being able to jump quickly from one end to the other also renders any kind of long-range transport routes near obsolete. The same is true for living on beta islands, with the main trading hubs (currently the alpha terminals) being just a few minutes away.
The basic concept and the reasons for the the new layout:
- Less complex teleport network: can’t reach “anything from anywhere”, gives individual islands more importance and makes them more unique.
- Breaking up the Alpha 1 triangle: factions get more meaning, and the trading of faction-specific items should be more induced (this will be complemented by further industrial changes, details in the next blog).
- Inserting Alpha 2 between Alpha 1 and Beta islands: this is intended to give Alpha 2’s a middleground role between the starting haven Alpha and the total hell that are the Betas. Alpha2’s have higher level NPCs, and those venturing there should already be aware of the dangers that Betas hold.
- Strategic variance in Gamma island connections: we have both relatively easily reachable islands with many entry points, and hard to reach “hinterland” islands with more defendable entries. We’re very curious which ones will be more craved for, and how they will be used.
- No island with only one entry point by design.
We also intend to create an unlock mechanism for opening the new islands, so they won’t be available from the get-go, and we’d also like to provide certain exploration rewards for the first pioneers. We’re still looking at our options on how exactly this will work, so I’ll get back to you with the details as soon as it’s settled.
The structure network planner
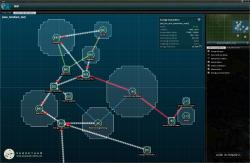
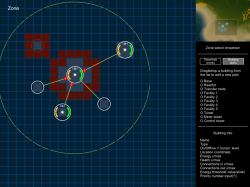
I have already shown you a crude concept of the network planner in the previous post, and before I start with the explaining of various building types, I’d like to show you our progress on it. As you can see, it all happens on a new tab in the world map window, and it’s available when you’re inside a terminal or out on the terrain, too. One grid cell in the planner is equivalent to one tile on the terrain, so buildings are shown accurately as they occupy an area.
Types of buildings are mainly identified by their icons and their size, but there is also the optional name-tag, and you can even rename any of them. You can also select an individual building to bring up an information panel with all its parameters and settings. We have a number of connection types between buildings (energy, control, booster, etc.), each of them having a specific shape and color for easy overview.
Building plans are displayed just like completed buildings, but in purple color. There are various options to help you in planning your network, the proper connection distances and validating the terrain where you intend to deploy a building. As said, it’s a fairly complex system and I could go on forever but I’d rather continue with the rest of the features. You’ll be able to read all about the details in the game guide and test it yourself :)
Building types
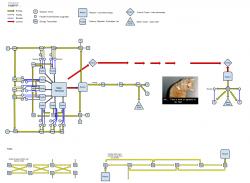
As you already know, the basic concept of PBS is a network of interconnected buildings. There are a number of building types, each of them having a special role within a structure network. In this section I will tell you a few details about each of them, and I hope this will help you get the big picture on the whole system. There is one important fact to remember while looking at the list: structure networks are limited by the number of connection slots of each building in the network, and by the balance of generated and consumed energy. Note that names can still change and some of the more specialized buildings may not make it into the first PBS patch.
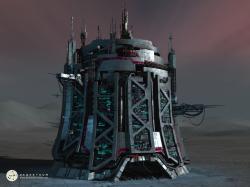
Main terminal
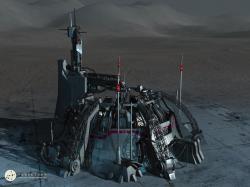
The central hub of your network, everything starts and ends with it. You can dock into it, equip your robots and store items, just like in any other NPC terminal. It doesn’t need any upkeep or energy to work - once built, it will stay there until someone destroys or deconstructs it. (Oh yes, it will be possible to deconstruct your buildings.) The main terminal comes in three different sizes, varying in number of connection slots, amount of HP, and physical size.
Another important role of the main terminal is that it provides ownership, or in other words, broadcasts control to all its connected buildings, which in turn further broadcast it to their connections and so on. If a building loses the chained control link with your network, it stops providing whatever its role is and you won’t be able to change its parameters until you regain control of it. More importantly, it’ll become open prey for an enemy network to “assimilate” it.
Control tower
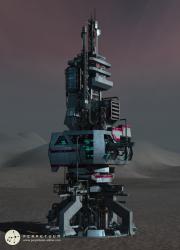
Like the name suggests, control towers broadcast control, and they can do this through relatively large distances. They can be used to create watchposts or mining outposts far from the core of your network and your main terminal. Control towers themselves do not need energy to operate, however they don’t transfer it either, so you need to build a reactor at your outposts too, in order to operate the surrounding buildings.
Control towers also function as defensive bastions, which I will explain further in the control and defense section.
Reactor
Reactors provide the necessary energy for your buildings to operate. They work very similar to a robot’s accumulator, but since they’re much bigger, they are also much slower regarding recharge (think days here). Like robot accumulators, they also have their peak recharge potential at 50%. However, a deployed reactor starts with 0 energy, thus the recharge starts out very slow, and if you connect many consumers to it at this point, it will never “kick in”.
There is also a quicker but more costly way of generating energy in your reactor: by fueling it with certain commodities, like vitricyl or prilumium. You can use this method if your reactor or reactors can’t provide the necessary amount of energy for your network, or if you want to kickstart a newly built reactor. Reactors can also be fed from other reactors, so if you already have a working energy network (with the necessary surplus energy), starting a new reactor should be easier too.
Energy transfer nodes
These little nodes are used to transfer energy from the reactors to all of the consumer buildings. They have a certain cycle time for this, so energy propagation through the network takes some time. There is also a little bit of energy loss when it goes through them, so taking energy via a long chain of nodes will “leak” a small but notable amount on its own.
Energy transfer nodes come in two sizes: the large one can transfer large amounts of energy per cycle, and they have bigger connection ranges (can be linked together from further away), but have only a few connection slots. These are intended for your main energy lines, the “backbone” so to say. Then there are the small transfer nodes, which are pretty much the opposite: small throughput, small connection ranges, but more connection slots. These will be your endpoint distributors.
Standard facilities
Basic main terminals don’t include any industrial facilities, you have to get the DLC for them. What this means is that you need to build the factory, the prototyping facility, the refinery and all the other individual facilities, and connect them to your terminal; only then will they appear in its facility menu. The trick here, of course, is that the main terminal has a limited number of inward connections.
Facility upgrades
Facilities have low efficiency on their own, but luckily we have facility upgrades to boost just that. Naturally, the increased energy consumption will not make it as easy as it sounds.
Special facilities
We’ll introduce two brand new facilities, which will only be available to be built on gamma islands. One is the Calibration complex, which will let you combine calibration templates of an item to get a higher efficiency CT. The other is the Decoder forge, and as you can probably guess, it will combine lower level decoders to provide you with a higher level one.
Defensive turrets
Your trusty watchdogs when you’re not home. They hit hard, and they hit far. In their current implementation they work with pure energy, but later on we might convert them to ammo-consuming beasts too, so you can chose your damage type.
There are three basic types: EM turrets have the highest dps, missile turrets have very long range and have the highest burst damage, and laser turrets are the most accurate at the cost of damage.
Mining tower
The name may be deceiving, as it’s not something that does the work while you’re not there. Instead, it works as an aura to allow you to exploit a new type of mineral, available only on gamma islands. This new mineral will be used to manufacture higher tier buildings.
Masker
Provides a masking aura for the robots in its range, making them harder to detect for other robots. Has no effect on buildings.
Repair nodes
These can be connected to any building and they will automatically start repairing any damage done to them, provided they have enough energy to do so.
Booster nodes
Currently, booster nodes can have either of the following functions: reduce the cycle time of turrets, increase the range of turrets, or increase the armor resistance of any building. Once you have a working booster node, you can simply select which one of those functions they should provide, and you can change this any time later on too.
As said, not all of these may make it in the first round, and we still have more ideas, for example solar panels which generate energy depending on the time of day.
Control, defense and capture
As I mentioned above at the main terminal details, control linking is a very important aspect of holding your network together. If you build parts of your network in a way that they depend on a single junction point, it will easily become a weak spot that you’ll have a hard time defending, even if you surround it with turrets of doom. When you lose such a junction point, you risk losing control of entire parts of your network, together with any connected defensive buildings, so redundancy will be pivotal in planning a solid network.
It’s not just a matter of losing control, but you may even find that the neighboring network snatched away your buildings. Such assimilation operations will be entirely possible: if there are any “orphaned” buildings in the connection range of your own network, which noone has control over, you can simply connect them to one of your buildings and they will start working for you.
Of course, losing parts of your network is one thing, but losing your main terminal with all your assets in it can be disastrous. Thinking about various defense mechanisms that allow you to get some sleep while not worrying to lose your main terminal made me write this post on the forums. While the idea of making the main terminal invulnerable as long as any other building is connected to it sounded good at first, it also made us realize that it makes a capture mechanism near impossible. If you have to destroy everything first in order to break control, there won’t be anything left to capture. This is especially true for the expensive high-efficiency facilities, which are connected directly to the main terminal, with no way to break control other than destroying the terminal itself.
We also tried to avoid any timer mechanisms, but in the end there is no way we can control the number of players attacking a base, and there needs to be some kind of solid attack window that you can count on as a defender.
So the final concept of the main terminal defense mechanism looks like this: as I mentioned above, control towers function as bastions, which means if at least one control tower is connected to it, the main terminal is invulnerable.
Once there are no control towers connected to the main terminal, you can start shooting it. When its armor reaches 50%, its emergency shielding activates, and once again it becomes invulnerable. This state lasts for 3 days, plus an optional 0-24 hours that the owner can set before it gets into emergency state. This makes sure that the defenders can set their own time of day when the terminal comes out of its emergency state, and becomes vulnerable. Once an emergency phase ends, it cannot be activated for 4 hours - that’s the window when the attackers can finish it off. The time when the emergency period ends can be scanned the same way you can scan for outpost intrusion times.
The combination of these two mechanisms should make sure that a lone terminal can’t be lost overnight, but it also makes sure that complex networks with many control towers and extensive defense systems will be much harder to take down, and then some more.
It's the little things
Besides giving you the possibility of building your own empire, we're also trying to add in some little extras that will make you stand out, and let you feel home. One of these things is that every corporation will be able to set a signature color, and this will be used for all the owned buildings' tint stripes, as well as the terminal inside background color.
Furthermore, what is an empire good for if you can't show it off? From the beginnings already, we really wanted to show territories in some way. Now with PBS, the occupied area of buildings finally provides a way to actually make your territory visible on the world map. We're aware that this is not something everyone would like, since it obviously gives away some strategic information, even though no individual buildings will be visible, just a colored "blob" (which also uses the color mentioned above). So this feature will be optional, CEOs can decide whether they want to show off or not.
We need your help
By now you should probably have a rough idea of the sheer complexity of this system. Since we are still merely a group of 10 people, it would be pretty much impossible for us to test it on our own. The outcome would most likely be an unbalanced patch, crawling of nasty bugs.
We have already set up a separate test server and as soon as we are finished with all the features, you’ll be able to come and fiddle with terraforming, planning and building before we deploy it to the live server. How and when exactly this will happen will be announced soon, stay tuned.
Well, I think that’s about it regarding the basics of PBS. Of course I’ll try to answer any questions, and I’m sure you have a few of those.
In the next blog I will tell you the tale of how we turned the industry upside down, to the extent that we probably should call it Industry 2.0.
I love cliffhangers.

